How To Run A Credit Bureau Report
When the Credit Bureau Setup is complete and you have set up debtors to be reported, you are ready to report to the Credit Bureaus.
The credit reporting functions of Collect! operate mostly behind the scenes, requiring little or no user intervention. However, sending reports to credit bureaus requires attention to detail. It is your responsibility to make sure that the information you send is accurate and complete, and that all the required information is included for the Metro standard that you are using.
 This topic can only be used after the Credit Bureau Setup is complete. Please refer to How To Setup Credit Bureau Reporting if you are not sure you are ready to run a credit bureau report.
Please be aware that there may minimum number of debtors and a minimum dollar value that credit bureaus will accept. Please check with your representative to determine these requirements.
Aged Out Accounts
Some locations require that you close out your accounts that have aged out as per legislation.
In the Member Center, we have included a couple versions of the CBR 7 Year Age Out Report that can be used to flag accounts with the Delete Account (DA) status.
The default report simply looks at listed date and payment date. If an account is listed more than 7 years ago and has not made a payment in 7 years, then it will be flagged for removal.
 WARNING: If you decide to update the report, you do so at your own risk.
Run the report before running the CBR process to update the accounts. See below for more information.
 The Member Center contains an automatic version of this report that an be run with the Collect! Scheduler.
Report Debtors To The Credit Bureau
WARNING: Reporting Credit is a legal matter. You are responsible for ensuring that the information you are sending is accurate and complete. Do not report credit without being absolutely sure about your legal rights and the legal rights of the person you are reporting.
At the Collect! Main Menu, select Tools from the top menu bar and then select Credit Reporting from the drop-down choices.
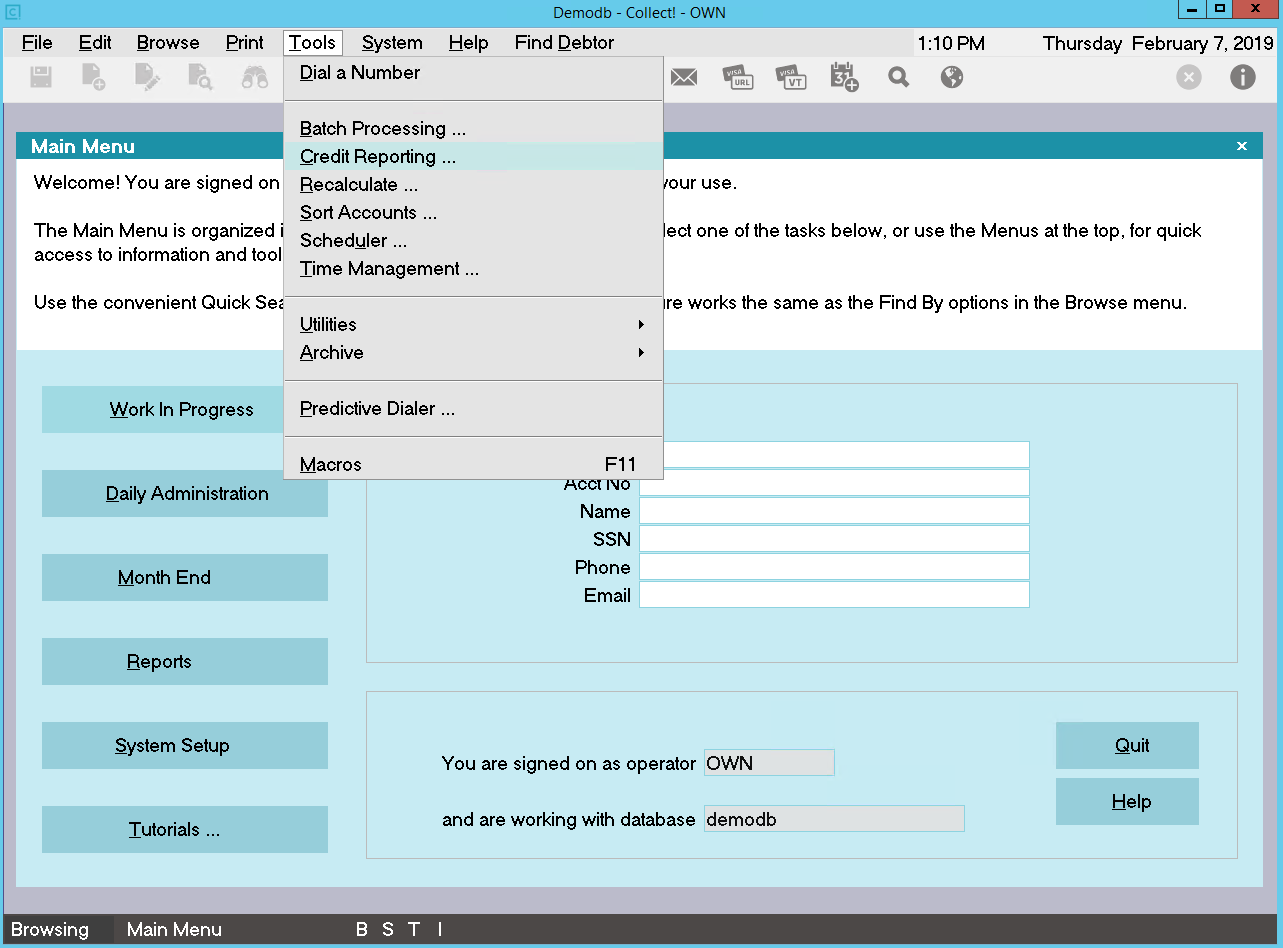
Tools Menu - Credit Reporting
This will display the Report To Credit Bureaus form.
Age Out Report
If you didn't run the Age Out Report first, and this process applies to you, select the Age Out Report. You can select either the report with output, or the automated version without output.
Click Here to View this Form.
You will notice several check boxes on the left side of the form. We want to know how many In Progress Metro contacts we have for Collect! to process.
If you would like to print the summary report, you can go to Print -> Reports and Letters and select the Credit Report List report before proceeding to the next step. The Credit Report List outputs all of the pending Metro contacts. It does NOT output the accounts to be reactivated. You can run the CBR process to reactivate the accounts first, cancel the process, then run the Credit Report List report.
The Sync Credit Report List report will output the accounts that are set to synchronized to the new bureau.
Report By Client
If report by client is switched ON, a client list will appear. Select the client to report for.
Tagging multiple clients will not work. Please select only one Client.
Before doing this you must set up the Client User2, User3, and User4 fields with values specific to the credit bureau being reported to.
User 2 = Trans Union codes
User 3 = Experian codes
User 4 = Equifax codes
Each user field should contain 4 numbers separated by commas (control number[5]) , (grantor code[10]), (center code[3]), (area code[3]) The number in brackets represents the maximum number of characters for each code. You do not need to put spaces before or after the commas.
Examples:
Trans Union
Client User 2 = 12345,1234567890,123,123
Experian
Client User 3 = 54321,0987654321,321,321
Equifax Client User 4 = 35125,5328598124,451,271
If any numbers at the end are left out, the defaults will be used from the Credit Bureau Setup dialog. If there is only a Control Number present then it will be used, and the remaining 3 values will be default ones. This applies only to values missing at the end of the list.
Please do not simply supply a Grantor Code, for instance, and expect it to work. The first number in the list is always assumed to be the Control Number, the second is always assumed to be the Grantor Code, etc.
Examples:
INPUT (CONTROL NUMBER) control number = overrides default grantor code = default center code = default area code = default identification = default INPUT (CONTROL NUMBER, GRANTOR CODE) control number = overrides default grantor code = overrides default center code = default area code = default identification = default INPUT (CONTROL NUMBER, GRANTOR CODE, CENTER CODE) control number = overrides default grantor code = overrides default center code = overrides default area code = default identification = default INPUT (CONTROL NUMBER, GRANTOR CODE, CENTER CODE, AREA CODE) control number = overrides default grantor code = overrides default center code = overrides default area code = overrides default identification = default INPUT (CONTROL NUMBER, GRANTOR CODE, CENTER CODE, AREA CODE, IDENTIFICATION NUMBER) control number = overrides default grantor code = overrides default center code = overrides default area code = overrides default identification = overrides default
It will only work in the order specified above. You cannot override the Center Code unless the Grantor Code and Control Number are also overridden. In other words, you can only override a code if the codes prior to it are overridden as well.
Choosing The Credit Bureau To Report To
You should be looking at the Report To Credit Bureaus form. Notice that are three names of Credit Bureaus on the left side of the form.
You can report to one Bureau only or all of them. If you select more than one Bureau, Collect! will produce three separate files, one for each bureau, one after the other. The prescan routine used by Collect! will be done only once even if you are reporting to more than one bureau.
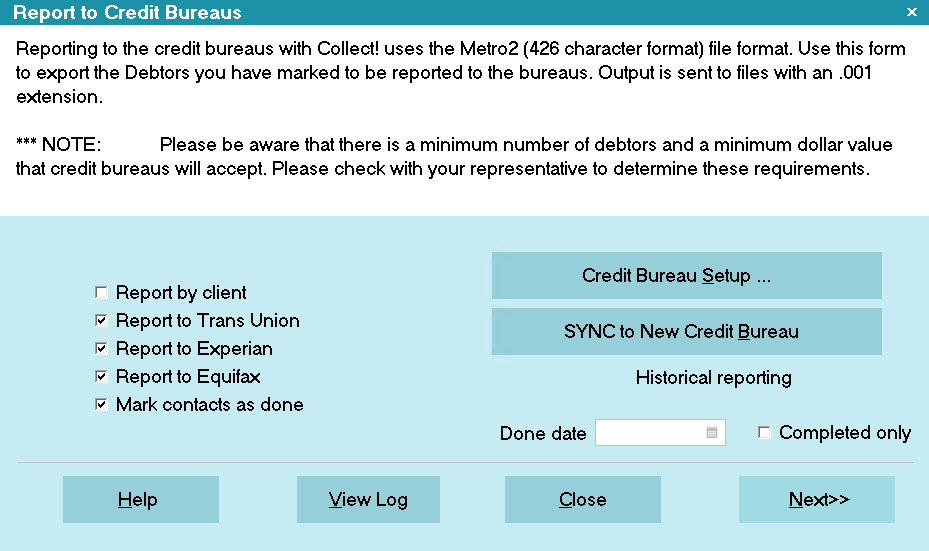
Report To Credit Bureaus Settings
Collect! will quickly count your active Metro contacts and present you with the results.
If you have fewer than 500 accounts actively being reported to bureaus, and you do not have REPORT ALL ACCOUNTS selected on the Credit Bureau Setup form, you will be prompted for further action.
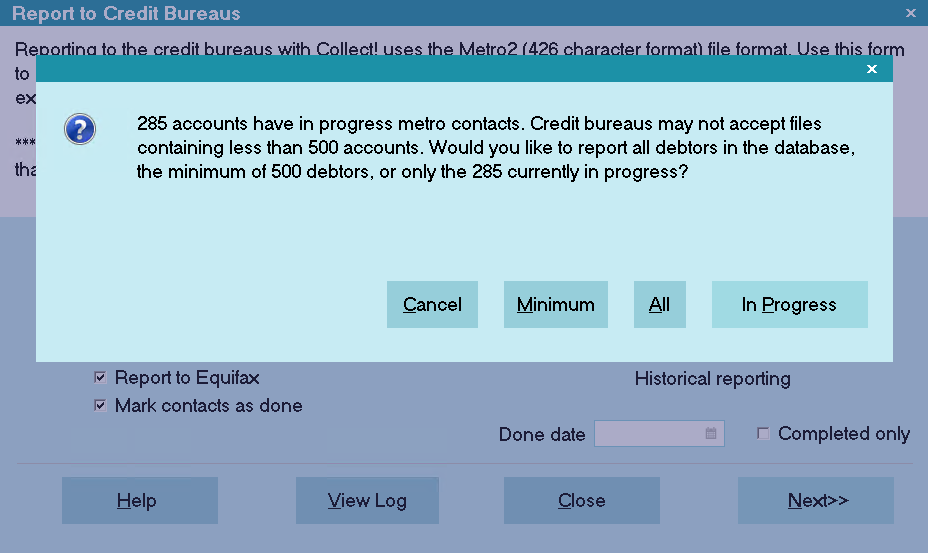
Report Minimum 500 Required Accounts
Please refer to the section below entitled "Reactivate Metros" for information about the choices that are presented to you.
Select ALL or IN PROGRESS when the prompt is displayed.
If you are reporting all accounts, Collect! will reactivate accounts create a METRO contact on the accounts that don't have one.
At this stage, Collect! will analyze your accounts to determine if any accounts cannot be reported. These include accounts with missing SSN or DOB values. You can select whether or not to continue.
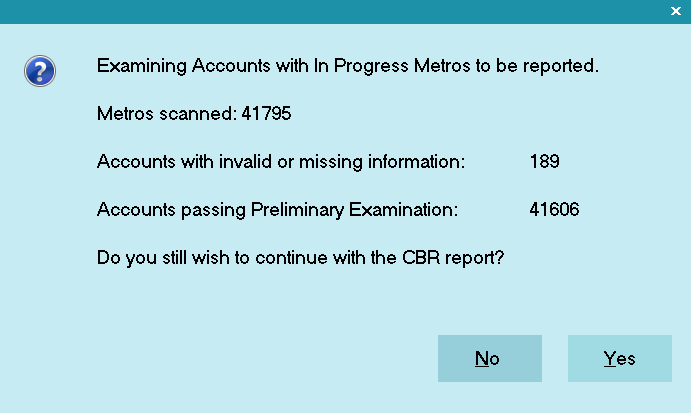
Examining Accounts for Invalid Metros
The screen shot below shows that Collect! will create a credit report file for the credit bureaus to the C:\Collect\Log Files\cbr folder with the following filenames, depending on whether you selected All, Consumer, or Commercial on the Report to Credit Bureaus screen:
| Bureau | All Accounts | Consumer Accounts | Commercial Accounts |
|---|---|---|---|
| Trans Union | {dbname}_TU.001 | {dbname}_TU_CON.001 | {dbname}_TU_COM.001 |
| Experian | {dbname}_EXP.001 | {dbname}_EXP_CON.001 | {dbname}_EXP_COM.001 |
| Equifax | {dbname}_EFX.001 | {dbname}_EFX_CON.001 | {dbname}_EFX_COM.001 |
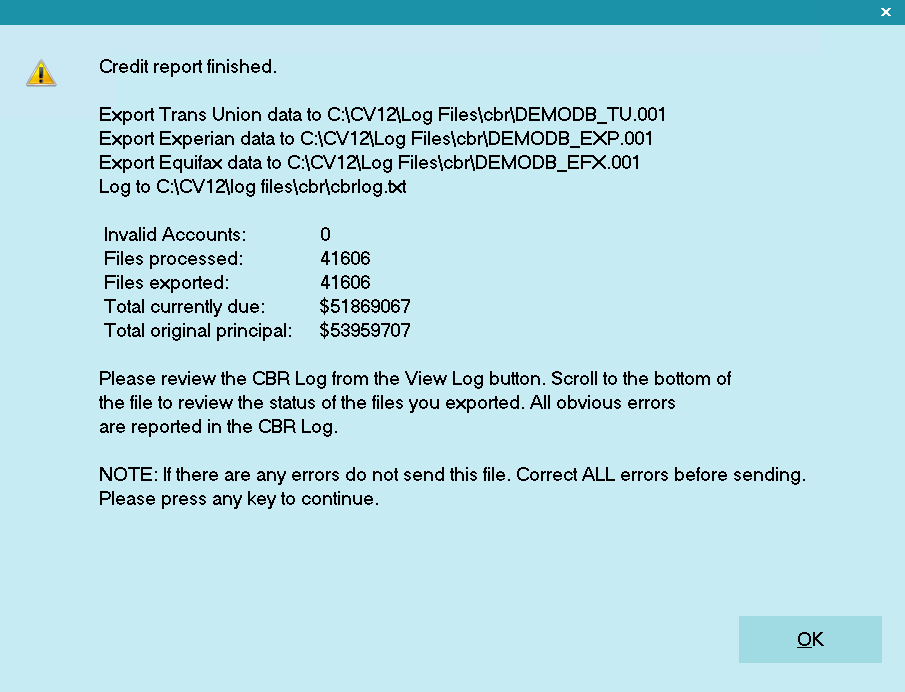
Export Data for Credit Bureaus
The viewed log message below shows examples of errors that you may see. Please go back to these debtors and add the necessary information and run your report again. You may even have to run a report a few times to correct all errors.
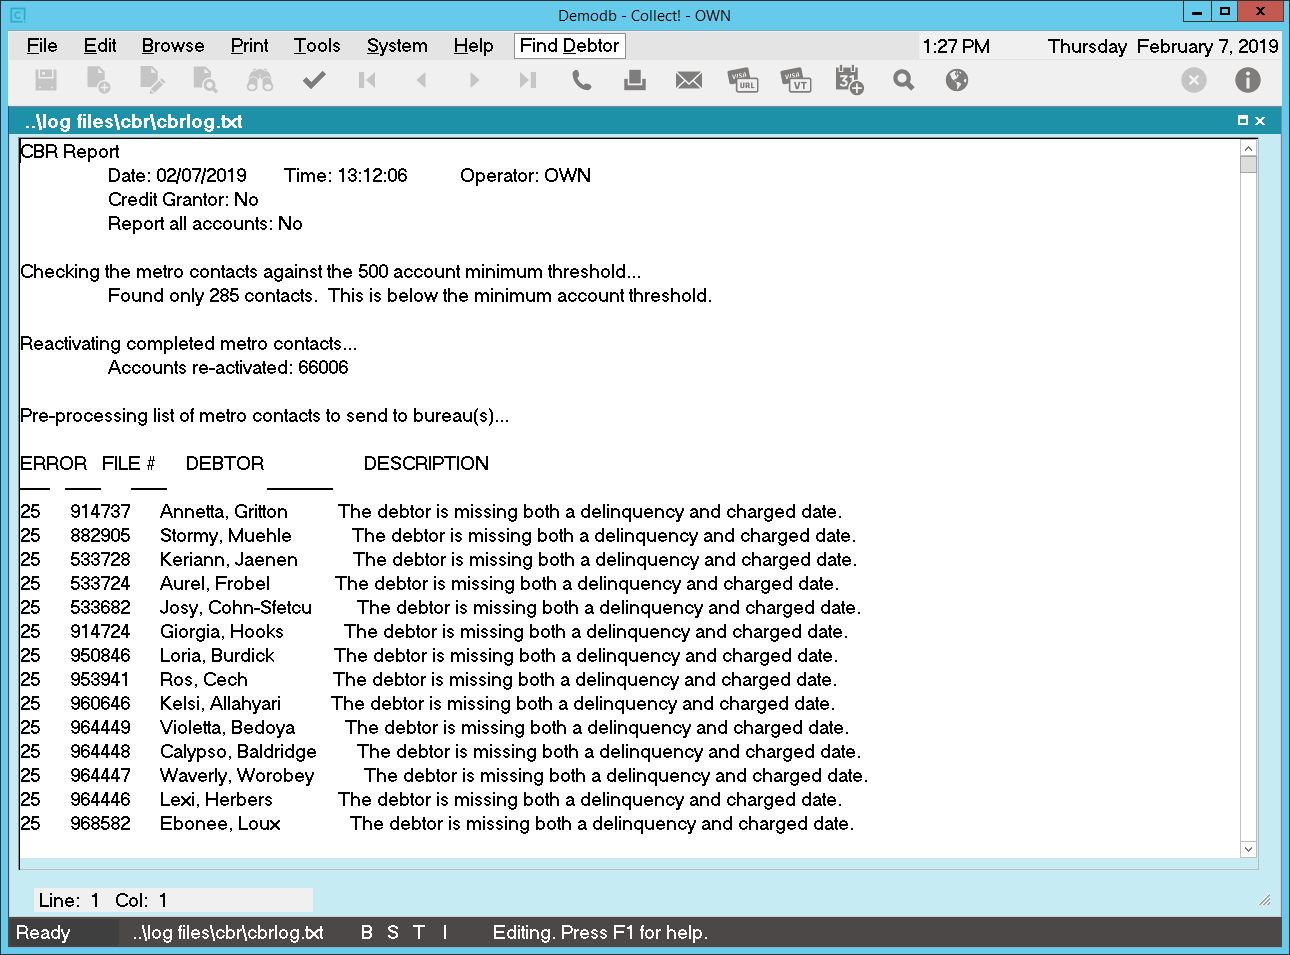
Errors Reported In CBR Log
If you don't usually clear the contents of this log when asked to "Clear Log" after viewing it, you may need to scroll to the bottom of the log to see the most recent session entries.
After viewing the log of your results, if there are no reported errors, you can now close the log. You will be prompted to clear the log. Choose YES or NO.
After you have corrected any errors, run your report again. When you have no errors, you can say YES when asked if you are done with the credit reports on the next screen.
When you run your report and it shows no errors, you are ready to send your file or files to the bureaus.
It is very important that contacts are marked done as the last step. It is also important that they are not marked done if you still have errors to correct and you want to include all the accounts in the final file that you create.
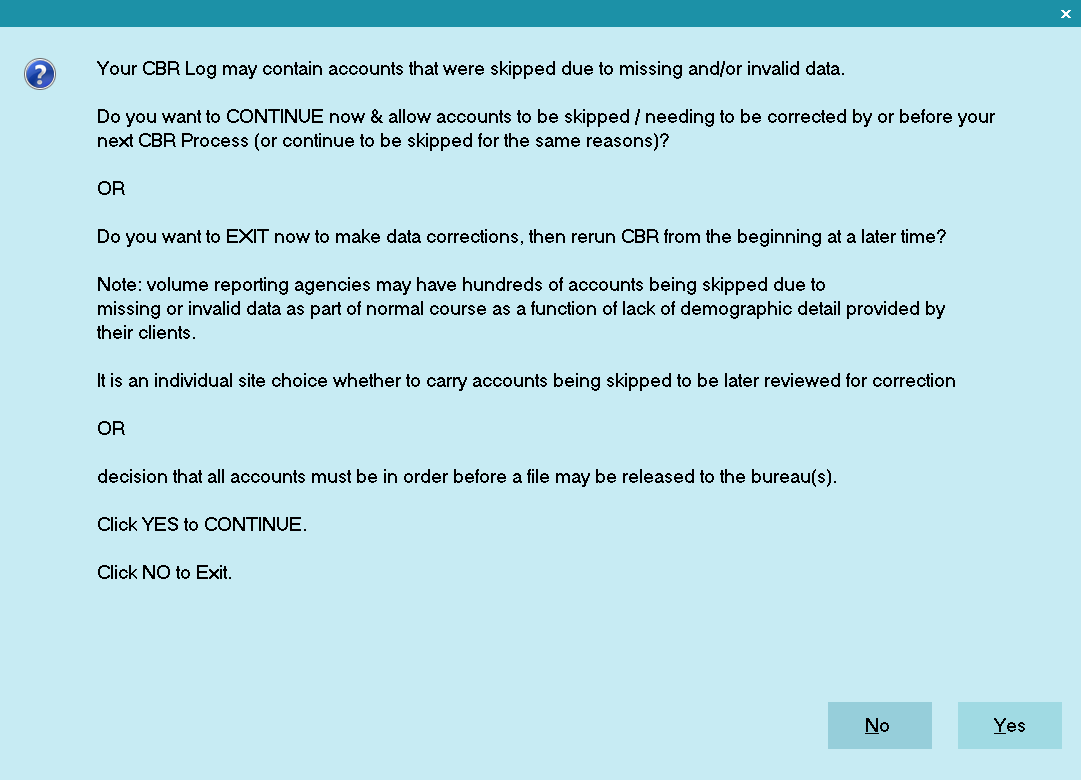
Select YES to Mark Contacts Done
If you have errors to correct, select NO. Correct your errors and run your report again.
If you are running a TEST file, select NO. Submit the test file to your bureaus. You will mark the the Contacts as complete when the live report is done.
Select YES only if you have no errors to correct and you want to mark the Metro contacts as done and send the file or files that Collect! just finished creating. If there are reported errors, the Metro contacts for these debtors will not be marked done.
When you select YES, Collect! marks all the Metro contacts as Done EXCEPT any outstanding errors. Metro contacts on accounts that could not be reported due to errors are left In Progress.
When you create a Metro2 credit report file, Collect! scans through all Metro contacts scheduled for today and the past. For each contact, Collect! sends the Debtor information to the Metro file, and marks the contact as done, setting its Done Date to today so you know when they were reported.
Collect! will automatically take care of creating next month's Metro contacts for your accounts, if appropriate. A final summary window will display the number of Metro contacts marked done and the number forwarded.
When a change occurs that needs to be reported to the bureaus (such as a change in the Debtor's owing, or you closing the account), Collect! schedules a new contact which contains the updated information. The next time you run a credit report, the new contact is detected and the update is sent. That contact is again marked as done, with its Done Date set appropriately, provided you have completed the report with no errors.
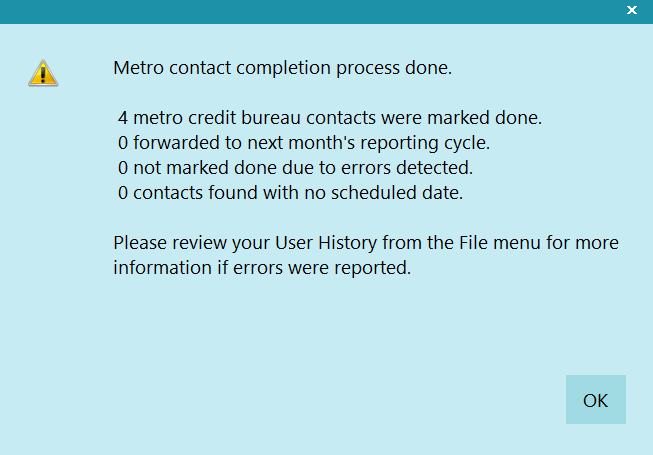
Summary of Metro Contacts Processed
- Please place a check mark in the box next to the Credit Bureau you are reporting to. Put a check mark for at least one credit bureau.
- Place a check mark in the box labeled 'Mark contacts as done'.
- Select whether you are reporting All accounts, Consumer accounts, or Commercial accounts.
- When you are ready, select the NEXT button to proceed.
- Collect! will display the bureau file it is creating, the name and location where the file may be found. If you are reporting to more than one bureau, this prompt will display for each bureau as shown below.
- After this Collect! displays the CBR Log for you. If there are any errors, they will be reported in this log. You can examine it for details and file numbers if you have errors to correct. One common error is no Delinquency Date.
- This is a very important step. When you are finished reporting each month, you MUST mark the Metro contacts as done BUT only if you are really finished with the report!
- Select OK to close the window.
- Once the files have been generated, you can now upload them to the respective Bureaus. The files are located in the Collect\Log Files\cbr folder.
WARNING: Do not attempt to change the text in the Description field of the Metro Contact, or INACCURATE REPORTING MAY OCCUR. This field is for display only. Collect uses it internally for storing encoded credit reporting information.
Reactivating Metros
Some credit bureaus will no longer process a file with fewer than 500 accounts. Collect!'s Credit Bureau Reporting function handles this by giving you options to reactivate Metro contacts. You may use these options to report as many of your CBR accounts as necessary to fulfill the bureau requirements.
If you have Report All Accounts checked on the Credit Bureau Setup screen, then you will not see the following prompts. Collect! will reactivate all accounts automatically.
Without the Report All Accounts checked, you will see the following prompts.
If you have fewer than 500 accounts to report, you are presented with the option of reporting all CBR accounts in the database, or reactivating as many accounts as needed to report 500 accounts.
Report Minimum 500 Required Accounts
Select Report In Progress to report only the accounts that have active Metro contacts. Please be aware that the credit bureau may reject your file if they require a 500 account minimum report.
Select Report Minimum to reactivate the necessary number of Metro contacts to report 500 accounts. This process may take a while as Collect! browses your list of debtors to find accounts with CBR switched ON.
Select Report All to reactivate all your Metro contacts and report all accounts with CBR switched ON. This process may take a while as Collect! browses your list of debtors to find accounts with CBR switched ON.
After Collect! determines which debtors have CBR switched ON, the required number will be reactivated. After the Reactivate Metros function has completed, the credit report file is created.
Historical Reporting
There are times when you may want to report to credit bureaus in a fashion that is not covered by the normal scheduled events. For instance, you may need to rerun a report that was already completed.
The historical reporting section of the Report To Credit Bureaus is designed to handle these anomalous reporting procedures. You can specify a date and/or choose to run your report on completed contacts.
DONE DATE
Choose a date to run a report on Metro contacts that were marked done on this particular date.
COMPLETED ONLY
Switch this ON to include only completed Metro contacts in this credit bureau report.
Historical reports are run following the same procedures outlined above, for regular credit reporting.
Financial Totals
Collect! manages all normal changes that you make to an account as it is paid and the Debtor's Owing proceeds to zero. All credit reporting details are handled automatically.
If you make changes to an account that are different from the norm, for instance a Judgment or Adjustment or Write Off or Settlement, then you will have to manually adjust your credit report settings at the Debtor level.
Closing Accounts
Collect! manages credit bureau accounts if Paid In Full and will send the appropriate code to the credit bureau and not report anymore. You can also set up Collect! to handle the non-CBR related changes that you may want to make to such an account (such as Debtor Status and Mode.)
If you close an account for other reasons, you will have to manually adjust your credit report settings at the Debtor level.
Canceling Credit Reporting On A Single Account
If you uncheck the Report to Credit Bureau box on the Credit Report Details screen before a report has been sent to the bureaus, Collect! simply deletes the scheduled Metro contact. No report on the Debtor will ever be sent.
If a debtor does not have a METRO contact that is marked DONE at the time you set the Status Code in Credit Report Details to Delete Account from Credit Bureau, then Collect! will assume the account has never been reported. Therefore Collect! simply deletes the Metro contact and switches OFF CBR.
If you choose to cancel reporting after having sent a report to the bureaus, select Delete from Bureau on the Status field on the Credit Report Details screen, and Collect! will schedule a Metro contact to tell the credit bureaus the account has been closed.